





1. Introduction to APIs & Postman
In modern software systems, components rarely operate in absolute isolation. They continuously exchange data, trigger events, and coordinate processes behind the scenes. This digital conversation is facilitated by APIs (Application Programming Interfaces), which serve as the secure, structured bridges between clients (such as mobile apps or web browsers) and backend servers. Ensuring that these APIs perform accurately under all circumstances is the primary goal of API testing.
An Intuitive Real-World Analogy
To make the core mechanics of an API immediately clear, consider three everyday analogies:
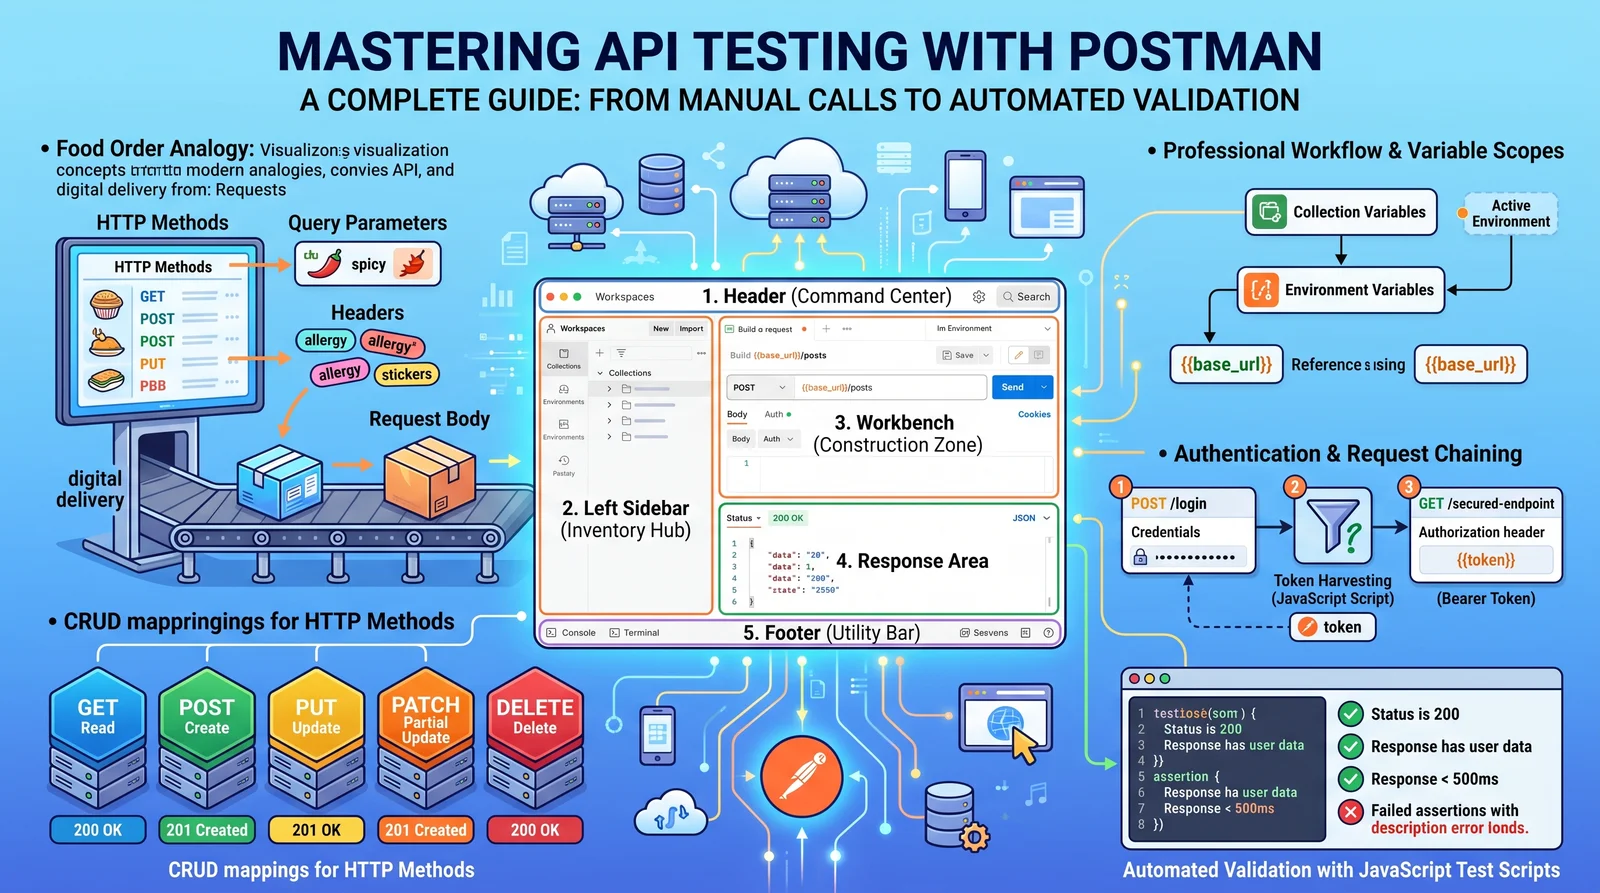
- The Food Order Analogy: When ordering at a restaurant, the HTTP Method (like GET or POST) is the type of order you place. Query Parameters are the customization filters (e.g., 'medium spicy'). Headers act as the special instructions (e.g., indicating food allergies), and the Request Body is the actual package containing your selected ingredients.
- The Parcel Box Analogy: Sending a parcel represents a POST request. The URL is the destination address on the front, the Headers are external handling stickers (like 'Fragile' or 'Express'), and the Request Body is the contents sealed inside.
- The Online Form Analogy: Filling out a form is a direct representation of a payload. The URL specifies which server accepts your input, Headers represent how the browser should parse it, and the Request Body represents your actual inputs.
Postman is the world's most popular API development and testing workbench, used by QA Engineers and Developers to orchestrate, analyze, and automate these HTTP calls through an elegant Graphical User Interface (GUI). By completing this guide, you will transition from manual testing to building highly automated e-commerce validation pipelines.
2. Postman Installation & Your First Request
Setting up Postman takes only a few minutes. You can choose between the standalone Desktop Client or the browser-based Web version, both of which offer full access to Postman’s testing capabilities.
1. Download & Install: Head to the official Postman Downloads page (postman.com/downloads) and download the installer for your OS, or opt for the web app.
2. Account Creation: Create a free account. Postman will email you a 6-digit verification code. Input the code to link your account to the cloud, allowing automatic synchronization of your work.
3. Create a Workspace: In the top-left, click 'Workspaces', select 'Create Workspace', choose 'Blank Workspace', name it 'Learning Postman', and set its visibility to Personal.
4. Initialize a Collection: In the left sidebar, click the '+' icon and choose 'Create Collection'. Name it 'My First Collection'. This collection will keep your requests organized.
Executing the GET 'Get Posts' Request
Let's build a request to a public testing server using the GET method to retrieve fake blog posts:
• Endpoint URL: https://jsonplaceholder.typicode.com/posts
• Method: GET
• Action: Click the blue 'Send' button.
Understanding the Response
Upon sending the request, look at the Response Area in the lower half of your Workbench. You will see two critical pieces of data:
1. Status Code: '200 OK', indicating the server successfully returned the data.
2. Response Body: A structured array of fake posts formatted in JSON.
3. The Postman Interface: A Tour of the 5 Zones
+-------------------------------------------------------------------------------+
|                               1. THE HEADER                                   |
+------------------+-----------------------------------------+------------------+
|                  |                                         |                  |
|                  |                                         |                  |
|                  |             3. THE WORKBENCH            |                  |
|   2. THE LEFT    |        (Active Request & Response Tabs) |    4. THE RIGHT  |
|     SIDEBAR      |                                         |      SIDEBAR     |
|                  |                                         |                  |
|                  |                                         |                  |
|                  +-----------------------------------------+                  |
|                  |                                         |                  |
|                  |           RESPONSE PLAYGROUND           |                  |
|                  |                                         |                  |
+------------------+-----------------------------------------+------------------+
|                               5. THE FOOTER                                   |
+-------------------------------------------------------------------------------+
Postman's interface is divided into five distinct graphical zones, carefully organized to streamline API configuration, testing, and debugging. Familiarity with these zones is essential to maintaining high productivity.
Zone 1: The Header (Command Center): The top-most navigation bar houses global controls. This includes Workspace toggles, Account settings, invitations for team collaboration, and the Universal Search bar—an extremely fast tool to find collections, variables, and API specs across your entire project.
Zone 2: The Left Sidebar (Inventory Hub): The central navigation tree where you manage Collections, environments, API definitions, testing mock servers, and history. You can 'star' favorite collections to pin them to the top of the sidebar for instant access.
Zone 3: The Workbench (Construction Zone): This tabbed interface functions like a web browser. The upper section allows you to configure outbound requests, while the bottom section displays server responses. Layout options let you pin response tabs side-by-side with request tabs for widescreen development.
Zone 4: The Right Sidebar (Contextual Inspector): A collapsible sidebar featuring advanced testing support. It hosts 'Ask AI' (Postman's artificial intelligence assistant to generate and explain scripts), variable scopes inspector, autogenerated request documentation, and developer code snippets in Python, Java, or Node.js.
Zone 5: The Footer (Utility Bar): Located along the absolute bottom edge, it provides access to the Console (the essential logger for API network requests), Terminal, and layout controls to hide/reveal sidebars.
4. Mastering HTTP Methods: The Verbs of REST APIs
HTTP methods are the action verbs that instruct the backend server on what operations to perform on a resource database. They correspond directly to CRUD (Create, Read, Update, Delete) database operations.
+--------+-----------------------------+------------------+------------------------+-------------------------+
| Method | Action                      | CRUD Mapping     | Payload Body Required? | Standard Success Code   |
+--------+-----------------------------+------------------+------------------------+-------------------------+
| GET    | Fetch existing data         | Read             | No                     | 200 OK                  |
+--------+-----------------------------+------------------+------------------------+-------------------------+
| POST   | Submit / Create new records | Create           | Yes (JSON/form)        | 201 Created             |
+--------+-----------------------------+------------------+------------------------+-------------------------+
| PUT    | Replace a record entirely   | Update (Full)    | Yes (JSON/form)        | 200 OK                  |
+--------+-----------------------------+------------------+------------------------+-------------------------+
| PATCH  | Modify specific fields      | Update (Partial) | Yes (JSON/form)        | 200 OK                  |
+--------+-----------------------------+------------------+------------------------+-------------------------+
| DELETE | Remove a record entirely    | Delete           | No                     | 200 OK / 204 No Content |
+--------+-----------------------------+------------------+------------------------+-------------------------+
Hands-On HTTP Method Lifecycle
Using the target host URL: https://jsonplaceholder.typicode.com/users, we execute a complete REST lifecycle sequence in Postman:
• GET (Fetch user): Requesting GET '/users/1' fetches User ID 1. Server returns 200 OK and their demographic details.
• POST (Create user): Sending POST '/users' with a body of name and email. Server inserts the user and returns 201 Created and an generated id.
• PUT (Update fully): Sending PUT '/users/1' with a full representation of the user. Missing fields will be cleared. Server returns 200 OK.
• PATCH (Update partially): Sending PATCH '/users/1' with only the updated email address. The other properties are unaffected. Server returns 200 OK.
• DELETE (Remove user): Sending DELETE '/users/1'. Server removes user 1 and returns 204 No Content.
5. Anatomy of a Request: Constructing Endpoints Manually
An API request is made of six key components. Understanding where these are located in the Postman UI is critical to writing accurate API transactions.
1. URL & Endpoint: The exact server location (e.g., api.example.com) combined with the target resource path (e.g., /users).
2. HTTP Method: The verb specifying your action (GET, POST, etc.) chosen from Postman’s dropdown.
3. Query Parameters: Appended to the end of the URL starting with a '?' to filter, paginate, or sort results. Inside Postman's Params grid, entering keys and values will automatically assemble the full URL for you. For instance: /users?name=John.
4. Headers: Key-value metadata pairs transmitting instructions. Standard headers include Content-Type: application/json (specifies payload formatting) and Accept (declares what the client expects).
5. Authorization: Secures APIs against bad actors. The Authorization tab handles credentials automatically (e.g., Bearer tokens or API keys).
6. Request Body: The actual data package (payload) sent with POST, PUT, or PATCH. Inside Postman, you configure this in the Body tab by choosing raw and selecting the JSON format option.
Example Request Body Payload:
{
"name": "John",
"email": "john@example.com"
}
6. Professional Workflow Organization: Collections & Variables
Hardcoding values—such as a domain URL or security keys—directly into multiple API requests makes testing environments fragile. If a server URL changes, you would have to manually edit every single request. Using Postman Variables solves this. You declare a variable once and reference it across all requests using double curly braces: {{variable_name}}.
• Hardcoded URL: https://api.example.com/users
• Parametrized Variable: {{base_url}}/users
Postman resolves variables based on hierarchical scopes. The most important scopes are:
• Collection Variables: Stored directly on a Collection parent. These are available to any request nested inside that collection, making them perfect for project-wide defaults.
• Environment Variables: Stored on specific Environment profiles (e.g., 'my environment 1'). This scope is only active when that environment is toggled active. It lets you switch the entire base URL structure from development to production instantly.
Understanding Variable Visual Indicators
Hovering over a variable like {{base_url}} in Postman's workbench displays its current value and active scope.
• Orange Text: The variable is active and fully resolved.
• Red Text: The variable is unresolved. Ensure you spelled it correctly and selected the correct Environment to activate it.
Authorization Inheritance lets you configure authorization protocols (like Bearer Tokens or OAuth Keys) at the parent Collection level. Requests in that collection inherit this config automatically, saving time and simplifying security token rotation.
7. Real-World Testing: Authentication & Request Chaining
Most business APIs are protected behind security gates. This requires testers to chain requests: executing a public login API, programmatically capturing the returned access_token, saving it to an active environment variable, and using it for authorized API requests.
Step 1: Authenticate at the Login Endpoint: Send a POST request to {{base_url}}/auth/login with the raw JSON payload:
{
"username": "emilys",
"password": "emilyspassword"
}
Step 2: Post-Response Token Harvesting: In the Scripts -> Post-response tab of the Login API request, add JavaScript to automatically parse the token and save it to your environment variables:
// Parse the JSON response body
let jsonData = pm.response.json();
// Capture accessToken and write to the environment
pm.environment.set("token", jsonData.accessToken);
console.log("Harvested Token: ", pm.environment.get("token"));
Step 3: Access Secured Endpoints: Add a GET request to {{base_url}}/auth/me. In the Authorization tab, choose Bearer Token, type {{token}}, and click Send. The server will read the dynamic key and return the private profile!
8. Automated Validation: JavaScript Test Scripts
Rather than manually inspecting each server payload to check if the data is correct, Postman allows you to write JavaScript assertions in the Scripts -> Post-response tab. Postman evaluates this code automatically as soon as a response arrives.
• Basic Status Code Verification: Verifying that the server successfully returned a 200 OK status code:
pm.test("Status code is 200", function () {
pm.response.to.have.status(200);
});
• Structural Property Assertions: Verifying that key data properties exist within the response body:
pm.test("Response has user data", function () {
const jsonData = pm.response.json();
pm.expect(jsonData).to.have.property("id");
});
• Comprehensive Business Rule Assertions: Validating mathematical calculations, token presence, and system response-time SLA performance bounds:
// 1. Validate that the dynamic Access Token is successfully generated
pm.test("Security Token Exists", function () {
const jsonData = pm.response.json();
pm.expect(jsonData.accessToken).to.not.be.undefined;
});
// 2. Validate that the cart financial calculations are strictly positive
pm.test("E-Commerce Cart Total is Valid", function () {
const jsonData = pm.response.json();
pm.expect(jsonData.total).to.be.above(0);
});
// 3. Ensure that the active API meets performance SLA response thresholds
pm.test("Response time is under 500ms", function () {
pm.expect(pm.response.responseTime).to.be.below(500);
});
When these scripts run, Postman displays a color-coded Test Results panel in the response Workbench. Passing tests appear in Green, while failing assertions display in Red with a detailed traceback explanation, highlighting errors immediately and enabling rapid debugging.

Junior QA manager at Codevioso, focused on API testing and the automated Postman pipelines that catch integration breakages before release.